Monday, September 11, 2006

Google

Construction

I wanted the wall finished in just a few days as I had to go back to work. I chose to use large concrete blocks which would be easy to assemble and which would go up quickly with minimal fuss.

I was lucky that I had a firm level slab onto which to start my construction. If I did not have this I would have had to create a 'footing' onto which to build.

Footings: http://www.quikrete.com/diy/FootersforWalls.html

First I stacked spare bricks on eack side of the work area. I then stretched a stringline between them and trapped it on top of the bricks with a piece of wood. As I finished each horizontal course I would raise the sringline on to the top of the next brick in the stack. This way I always had an accurate horizontal string guide with which to work.

The Mortar Mix.
My house has colorbond guttering, downpipes, facias and garage doors all of the same colour ( Merino ). I felt that it was important to colour the stark white mortar a shade of beige to allow it to blend in with the rest of the house. In order to colour it I added yellow coloured grout to the basic mix. The basic mortar mix was 1 shovel of Cement Powder, 3 shovels of washed sand and a small amount of water to create a mix with a low 'slump'. I would then add 2 cupfuls of coloured grout and blend it through.

When I came to render the inside of the water bath I used the same mix with the addition of a 'plasticiser' ( Bondcrete ) to make a more free flowing mix which could be worked smooth.

The Main Wall
The main rear wall was constructed first. I started from the centre and worked out to the left and right. This ensured that the finished wall would be perfectly central and meant that I did not have to calculate the widths of the vertical mortar joins into my plans. Each brick was checked for both horizontal and vertical alignment with a spirit level. I would also stand back and make sure that the brick "looked right". The look of a finished product is, to me , the most important thing!

When I had reached the finished height of the front bath section I stopped on the rear wall and started on the bath.

A thick , generous amount of mortar was used at each join. I could always scoop off any excess but I could not add more if there was not enough. A lot of mortar also meant that it was easier to adjust each brick with light taps from a rubber mallet to bring it level and in line with the stringline.

When I got to the row where the water outlet had to be placed, I "liquid nailed" the aluminium water guide in to position.

Liquid Nails: http://www.selleys.com.au/itemDisplay.aspx?ItemID=2

For the bricks I used a double helping of mortar and sat the bricks that were on each side of the water guide onto small rocks which were concealed, embedded into the mortar. This ensured that the bricks did not drop too much whilst the mortar set, which would have resulted in the slot for the water outlet being too thin and the possible crushing of the aluminium water guide.

The centre brick was supported by a steel lintel made of two pieces of metal angle at the front and the back. This lintel was also supported by hidden rocks whilst the mortar went 'off'.

The Capping Stones
Before long all of the large bricks had been laid and all I was left with were the 'capping' stones.
Because the large bricks had been placed accurately, it was a simple task of 'Liquid nailing' the capping stones into place on to the top of the sides and the front bath.


The capping stones on the top of the rear wall, however, were meticulously mortared into place and set perfectly level. This was a very important finishing touch! If these capping stones were out of alignment anyone looking from the front would have picked it instantly as it would have shown up against the horizontal fenceline behind!

Thursday, September 07, 2006

Google

Other Considerations


One of the major aspects of the design that we had to get right was the capacity of the water pump which we were going to use.

If the pump was too weak, then we would not have been able to achieve the desired rate of water flow from the top slot. Any pump which had been installed and then found to be inadequate would be a non-returnable item and as such would have been money wasted.

If the pump was too powerful then the surplus pressure would have to be vented off somewhere otherwise there would have been the risk of 'stressing' the pump and seals.

"But how to calculate the desired flow rate?!"

What I did was quite simple but worked well. After connecting all of the pipe work I screwed on to the waterfall feeder tube a common 'male' hose pipe fitting.

I connected my garden hose to the fitting and turned on my tap slowly until I achieved the desired effect. Without disturbing the tap setting I then disconnected the hose and allowed the water to flow freely into a 10 Litre bucket. Whilst the bucket was filling up I timed it.

It took 30 seconds to fill.

From this experiment I was able to determine that the desired flow rate was 20 Litres a minute at a height or 'Head' of approximately 1.4 metres.

After some consultation with the guy in the water feature shop, it was decided to go for a pump with a 30 litre per minute capacity. This would allow us to increase the flow if we desired or even run a second feature.

Basically the advise is to get a pump which exceeds the required capacity.

You can always reduce the output by bleeding off the excess , but you cannot increase the output of a pump if you later find it to be inadequate!

DID THIS POST CONTAIN USEFUL INFORMATION FOR YOU?

Wednesday, September 06, 2006

Google

Finishing Touches

And so the main construction was over. The heartache had ended, the tools had been put away in the shed and my back could finally start on the road to recovery.

Now for the finishing touches.

A final (Third) coat of sealant was applied with a paint brush to all the faces and tops of the bricks and capping stones. The difference that this made was only minimal and instead of glossy shine which I had originally expected, a subtle, almost impeceivable sheen was seen when you viewed the wall from an angle. It was more noticeable, some time later, when it rained a short shower and the water droplets 'beaded' on the surface of the bricks.

Inside the water bath could be seen the pump, light and associated leads and conduits. This needed to be concealed to provide a professional finish to the project. A couple of large left over bricks were placed on end into the bath. I placed them onto two rubber car mats which, when placed on to the floor of the bath, would prevent the internal rubberised coating from getting damaged by the rough edges of the bricks and perhaps allowing water to leak out.

On top of these bricks I placed a sheet of one inch square steel mesh which I had brought from my local hardware store and cut down to size. I had made it one square larger than was needed all the way around. This one inch border, I then bent upwards, to give lateral strength to the otherwise fairly flexible wire grid.

Having used an angle grinder with a metal cutting disk to cut a three inch square hole, I gingerly placed the mesh over the projecting fountain head and lowered it down, again, being careful not to scratch the coating on the internal walls.

The shallow mesh basket was filled with two 5 Kg bags of two inch white stones. They were some 4 to 5 inches below the final surface of the water and concealed the inner workings of the bath perfectly. Only the fountain spout and the lens housing of the light could be seen.

On top of the white stones was placed the true finishing touches. Two aquatic plants from the local nursery were positioned either side of the fountain and at such a height that they could be seen when viewed from the front of the wall. Suddenly the water wall assumed a completely different look. The addition of the plants had brought it to life and given a 'natural' aspect to it's overall look.

Google

It's Done!!


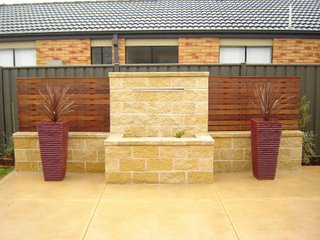
Here we can see a photograph of the finished product in all it's glory. It is slightly shorter than our surrounding fence so as not to annoy the neighbours.

The only differences between it and the planned version is that it is one brick wider on each of it's sides.

This was a suggestion by my beloved wife as she felt that the original version was not in the right proportions in relation to the widths of the various sections.

After I had gone ahead and made it wider, I remembered that I had designed it that width to reduce wastage of wood when constructing the side panels. The wood ( Merbau Decking ) could come in lengths of 2.7 metres. The original plan was to have each side roughly half a plank width wide.

As it is, I think that my wife was right, it does look better wider, the wastage of wood was just an unfortuanate 'casualty of war' and the lesson is that :

"If you want it to look good then you'll have to pay for it!"

Monday, September 04, 2006

Google

Lessons Learned


OK...so I didn't get everything right,...things could have been better. This is where you can learn from my mistakes, and where you can benefit from my experiences. I hope that you do and if so, your water feature will turn out better than mine which will make it a real 'Balltearer' of a water feature!'.

First off, because I used bricks with a 'Split-Face', I should have had some reversed to make the construction better. For example the bricks which were below water level at the rear of the 'Bath' could have been either smooth face forward or backward. After I had finished the main construction I realised that I should have placed the bricks that were below water level with the smooth face forward.

This would have meant that when I rendered the interior of the water bath, it would have been easier to do and the finished product would have looked better to the observer looking in to the bath from the top/front.

Also, if I had placed these bricks smooth side out, it would have given me the option of adding a vertical centre column of bricks, extending one brick above the finished water level which, when topped with capping, would have given an attractive horizontal platform onto which the falling water from the waterfall would have run off of. This would have removed the neccessity to have had a 'Fountain' feature in the bath to give a 'Falling Water' sound. ( Without the Platform or Fountain, I doubt wether there would have been sufficient water velocity to create a noise).

Secondly, although the finished product looks great, a quick check with a spirit level reveals that the main wall leans to the rear by about one half of an inch over the entire height of the wall.

I was obssessed, during construction, with checking that the bricks were perfectly horizontal, left to right. If they were slightly out fore and aft, I could live with it, it was only by a small amount anyway and I thought that that shouldn't matter in the grand scheme of things. I was more concerned that the water would flow out of the slot in a perfectly even manner, so the horizontal aspect was more important to me.

When I had finished I did a check with the level and was dissappointed that I had allowed the wall to slope backwards slightly. I told myself that this would improve the flow of the waterfall down the front face of the wall and allow the water to 'adhere' to the wall better, I was of course kidding myself, and actually I was quite annoyed that I had not forseen the error.

I like to think that future generations might look at something I have built and think that I was a perfectionist. On this occassion, however, they would not. The point that I am trying to make is that each brick must be checked left to right & fore and aft with the spirit level as it is laid and any errors are to be removed as you go with a light tap of the mallet.

Thirdly, I chose an uplight that was far too bright! I said to my wife that with the light given out by the 50 watt globe which I had installed, I could have backed our car into the garden at night and worked on it! - Take my advice and go for a light which is say 20 watts or less. Subtle lighting is the key.

Last but not least, don't be in too much of a hurry to see the finished product. I could not wait the reccommended times for the various treatments to dry and as such, again, felt that I had not done as good a job as I could have done!

This was proven by the damp stain which appeared in the mortar as a result of not letting the waterproof coating dry adequately. This resulted in me draining the damn thing and waiting a day for it to dry out before recoating the walls with a third and forth coat.

Google

Final Post - Finished Product


So here it is ...the final Post.

I must say that I am more than pleased with the finished product!

I look at the finished project and think to myself that some other person must have built it for me! - I am that pleased with it that I can't believe that I designed and constructed it myself from scratch! - It was probably the singular most ambitious project that I have ever attempted, it took me 9 months from conception to construction, but I am very pleased to announce that it was well worth the wait.

I've said it before but I'll say it again,...when I switched it on for the first time and everything flowed and lit up as predicted I thought to myself..."I love it when things just work!!!"


My wife 'Julie' has been on the phone inviting people around to look at the new water feature. I have been pouring myself a Whiskey and Coke and sitting outside by starlight to listen to the soothing sounds of the trickling water and to watch the dancing patterns of light mesmerise me in a way I have never known.

To anyone contemplating a water feature in their garden , I would say,... "Go for it!"

I hope that this 'Blog' has been of help to you if you are considering such a project and, if you do make a go of it, I expect you to leave some comments to let me and others know how you went.

GOOD LUCK!
More pictures are here : http://www.flickr.com/photos/marvinstokes